How to Test a Diode with a Multimeter: A Step-by-Step Practical Guide

A diode is a fundamental electronic component that allows current to flow in only one direction. If you want to better understand how it works, we recommend reading our article: What is a diode and how it works. In this article, you will learn how to test a diode with a multimeter, determine if it is in good condition, and easily detect common faults. If you prefer a quick, visual explanation, the following video shows you the correct way to test a diode with a multimeter and the mistakes you should avoid.

Table of Contents

Why is it important to test a diode?

Testing a diode is important because it:

  • Helps detect faults in electronic circuits.

  • Prevents unnecessary component replacement.

  • Aids in diagnosing power supplies, chargers, and electronic boards.

  • Prevents damage to other components in the circuit.

Tools needed to test a diode

To test a diode, you need:

  • Digital or analog multimeter.

  • The diode to be tested.

  • (Optional) Test leads or alligator clips.

Recommendation: Use a digital multimeter with a dedicated diode test function.

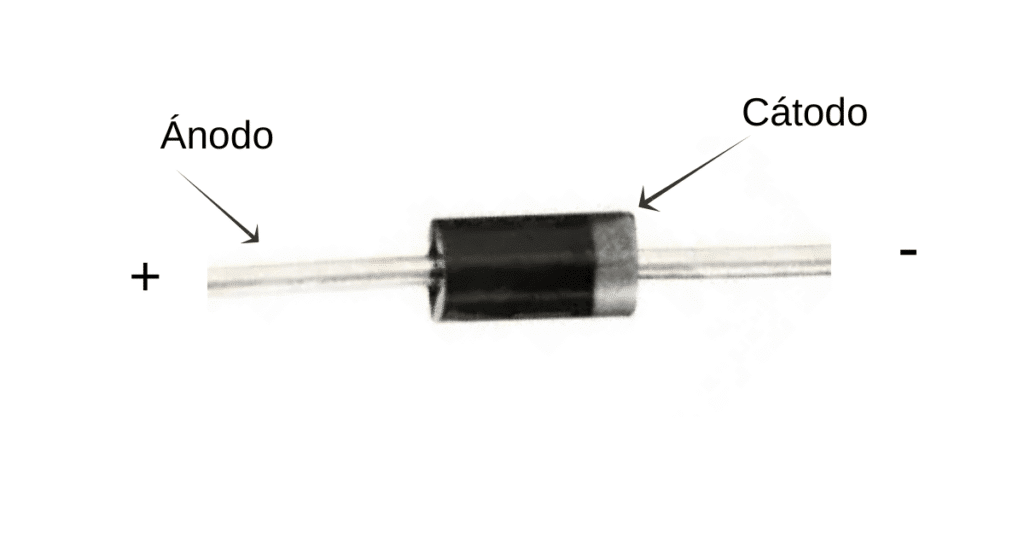
Identifying diode terminals (Anode and Cathode)

Before measuring, you must identify its terminals:

  • Anode (A): Positive terminal.

  • Cathode (K): Negative terminal (usually marked with a band).

Pro Tip: The band on the diode’s body indicates the cathode.

Como identificar las terminales de un diodo

If you prefer a quick, visual explanation, the following video shows you how to identify the terminals of a diode.

How to test a diode with a digital multimeter

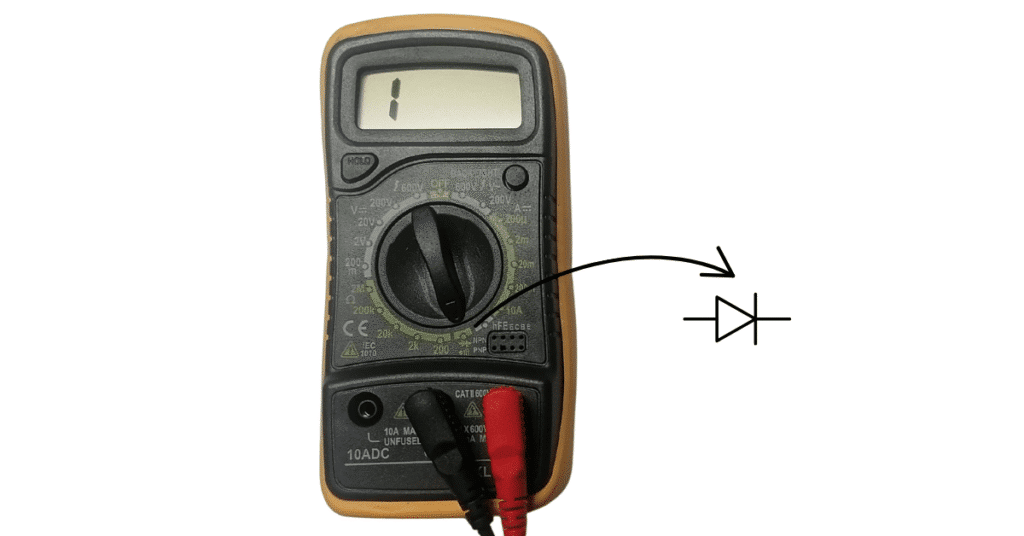
Step 1: Set up your multimeter

Set your multimeter dial to the diode test symbol (usually represented by an arrow with a vertical line).

configuración del multímetro para probar diodos

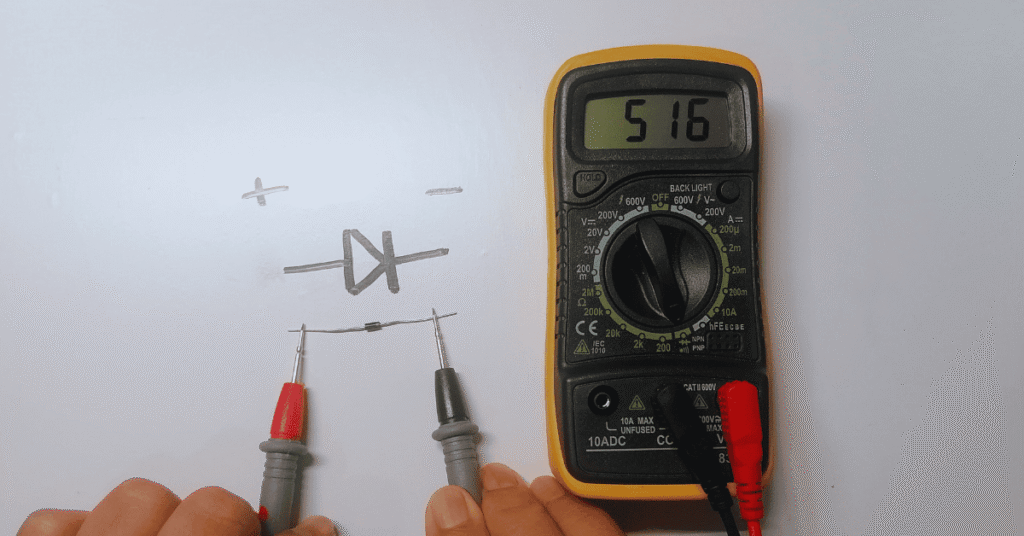
Step 2: Forward bias measurement

  • Red probe (Anode): Connect to the anode.

  • Black probe (Cathode): Connect to the cathode.

Expected result: The multimeter should display a voltage reading between 0.5 V and 0.8 V (for silicon diodes). For LEDs, this value may be higher. This indicates that the diode is in good condition.

Prueba de diodo con multímetro en polarización Directa

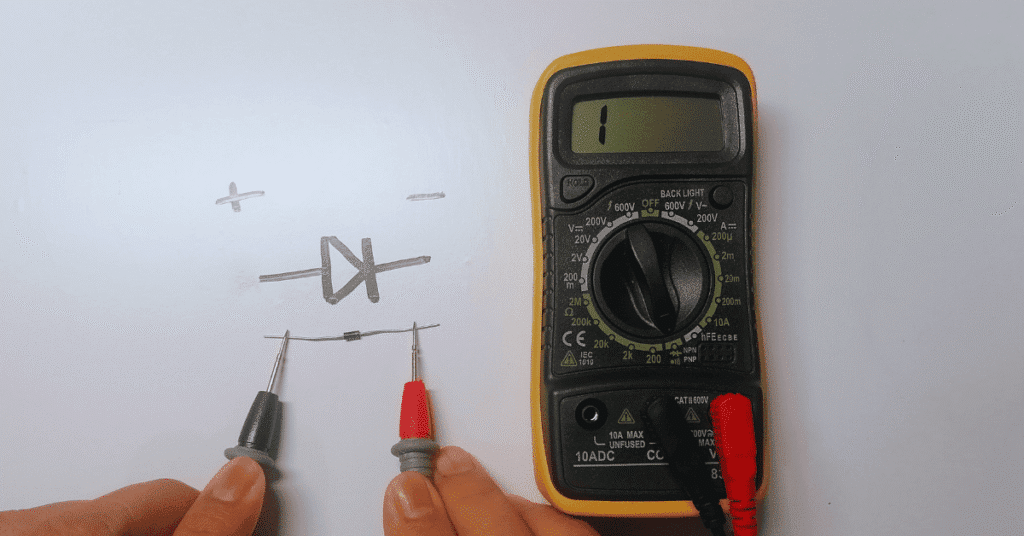
Step 3: Reverse bias measurement

How to perform the test

Invert the test leads:

  • Red probe → Cathode

  • Black probe → Anode

Expected result

The multimeter should display “OL” or infinity. In this case, the multimeter shows “1”, which indicates infinity.

This confirms that the diode is correctly blocking the current in the reverse direction.

probar diodo con multimetro

How to test a diode using resistance mode (Ohms)

If your multimeter lacks a diode test function:

  1. Set the multimeter to the Ohms (Ω) setting.

  2. Measure in both directions by swapping the leads.

Expected results:

  • One direction: Low resistance.

  • Opposite direction: Very high or infinite resistance. ✅ If this happens, the diode is functioning correctly.

Common diode failures

Here are the most common failures:

  • Short-circuited diode ❌ Displays continuity in both directions.

  • Open diode ❌ Does not conduct in either direction.

  • Leaky diode ❌ Conducts partially in reverse direction.

  • Burnt diode ❌ Irregular or unstable readings.

  • Inverted diode in the circuit ❌ Causes equipment malfunction.

Common mistakes when testing a diode

  • Testing it without removing it from the circuit.

  • Using the multimeter incorrectly.

  • Failing to correctly identify the anode and cathode.

  • Confusing LED diode values with rectifying diode values.

Conclusion

Testing a diode is a fundamental skill for anyone working with electronics. By following these simple steps—whether using the dedicated diode test mode or the resistance setting—you can quickly and accurately diagnose component health.

Remember:

  • Good diode: Shows a voltage drop (0.5V–0.8V) in forward bias and “OL” in reverse bias.

  • Faulty diode: Shows continuity, open circuit, or unstable readings in scenarios where it should be blocking or conducting.

Mastering these basic diagnostic techniques will save you time, prevent unnecessary part replacements, and help you troubleshoot circuits like a pro. Keep your multimeter handy and don’t hesitate to test components whenever you encounter a malfunction in your electronic devices!

Related Articles

Continue learning with our specialized guides:

  • What is a diode and how it works

  • Types of diodes and their applications

  • How to test a transistor with a multimeter

  • What is a relay and how it works

  • What is voltage and how to measure it

Scroll to Top